Translating between velocity vs. time and position vs. time graphs of accelerated motion is very difficult for students new to graphical kinematics. A powerful mnemonic for solving such problems is described and examples of its use are shown.
KEY WORDS
magic circle, graphical kinematics, acceleration, mnemonic
PRESENTED
American Association of Physics Teachers, Northern California/Nevada Section Fall 1993 Meeting, San Francisco City College, San Francisco, CA
PUBLICATION REJECTIONS
The Physics Teacher, August 1995; The Science Teacher, March 1996
Introduction.
Among the most difficult problems encountered by students in introductory physics courses are those involving graphical kinematics with uniform acceleration. While I find such exercises valuable enough to include in my curriculum, I also find there are many students who are unable to get a firm grasp of the content before we must move on to more interesting challenges. One such student repeatedly asked for further clarification and alternate explanations of these processes which, after all, are graphical calculus. It was for that student that I developed the Magic Circle (figure 1).

The Magic Circle is a mnemonic that may be used in translating between position vs. time and velocity vs. time graphs when uniform acceleration is occurring. Describing the use of the Magic Circle is an order of magnitude more difficult than actually using it, so I will offer two annotated examples and urge readers to try other problems for themselves.
Problem 1: Plot the position vs. time graph for a body whose velocity vs. time graph is shown in figure 2.

1. The velocity progresses from zero to some positive value, then progresses from that positive value back to zero. Label the three points of interest on the velocity graph: 0, +, and 0 (figure 3).

2. To determine the shape of the position graph that corresponds to the first segment of the velocity graph, use the Magic Circle. In the first segment, the velocity progresses from 0 to +. Find the section of the Magic Circle that joins 0 to +. But wait, there are two such sections: one above that arrow and one below. The valid section is the one that joins 0 to + in the direction of the arrow. For this example, that's the section below the arrow. See figure 4.

3. "Cut" that section from the Magic Circle and "paste" it to the position graph so that it ends concurrently with the corresponding segment of the velocity graph (figure 5).

4. Moving on to the second segment of the velocity graph, we see that the velocity progresses from + to 0. To determine the shape of the corresponding segment on the position graph, find the section of the Magic Circle that joins + to 0 in the direction of the arrow.
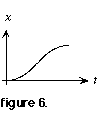
5. "Cut" that section from the Magic Circle and "paste" it to the position graph so that it adjoins the existing plot and ends concurrently with the corresponding segment of the velocity graph. See figure 6.

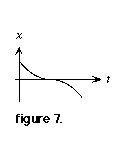
Problem 2: Plot the velocity vs. time graph for a body whose position vs. time graph is shown in figure 7.

1. Divide the plot into segments: the first segment is concave up; the second is concave down.
2. Match the shape of the first segment to a section of the Magic Circle. ("Cut" the segment from the graph and place it on the section of the Magic Circle that shares its curvature. For this example, that's the section joining - to 0. See figure 8.

3. Use the - to 0 connection to guide your plot of the velocity graph. Draw a straight line on the velocity graph that starts with a negative value and ends at zero in figure 9.

4. Moving on to the second segment of the position graph, again find the section of the Magic Circle who's curvature matches that of the plot. In this case, it's the 0 to - section.
5. Picking up at the point in time where the last segment left off, draw a straight line on the velocity vs. time graph that begins at zero and ends with a negative value. See figure 10.

You will notice that none of these exercises involved numbers. The slopes and curves are challenging enough for beginners. Note also that each segment involved uniform (albeit discontinuous) acceleration.
I typically introduce the Magic Circle at the very end of the unit on graphical kinematics. Student reaction is generally positive: they act as if they've been given the answers to an upcoming exam. (In a way, I suppose, they have.) They use the Magic Circle to slice through problems that had once stymied them; they go back to previous assignments and correct their own work. Their confidence rises dramatically.
Someone invariably protests that the Magic Circle should have been taught at the beginning of the unit. I actually tried that once, and students got hung up in the seemingly awkward and arbitrary procedures connected with the Magic Circle. It was more a source of confusion than of clarification.
One last point of caution. Once students can apply the Magic Circle and solve the most challenging graphical kinematics/acceleration problems, many will try to use it to solve otherwise simple problems involving uniform motion or rest.
With any luck students will eventually see that there is no magic in the Magic Circle. They'll realize it's just a circle with the signs of its slope labeled at six points. At that point, of course, they will no longer need this mnemonic.
Back to Mr. Baird's Phyz Home Page.